How to Create CNAME RECORD for custom domain
If you’d like to use your own custom domain for QR code scanning with JoyQR, it’s a simple process that involves setting up a CNAME record.
What is a Custom Domain for QR Code Scanning?
A custom domain lets you use a personalized subdomain (like qr.yourdomain.com) for scanning QR codes, instead of using JoyQR’s default domain. This helps create a more professional and branded experience for your users.
How to Set It Up:
- Choose a Subdomain: First, decide on a subdomain you want to use, such as qr.yourdomain.com or go.yourdomain.com.
- Access Your DNS Settings: Log in to your hosting provider’s control panel or DNS management section where you can manage your DNS records.
- Create a CNAME Record:
- Add a new CNAME record.
- In the hostname or subdomain field, enter the subdomain you’ve chosen (e.g., “qr” if you picked qr.yourdomain.com).
- In the target or value field, enter hostname.joyqr.com exactly as shown—no changes needed.

- Cloudflare Users: If you’re using Cloudflare, make sure to disable the Proxy for this CNAME record so everything works correctly.
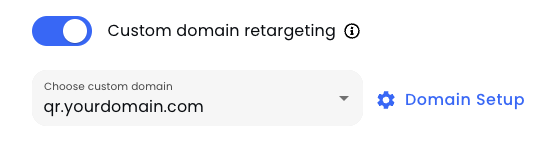
- Add the Custom Domain in JoyQR:
- Go to the JoyQR dashboard.
- Add your custom subdomain (e.g., qr.yourdomain.com) under the custom domain settings.
- Wait for DNS Propagation: Once you’ve set everything up, the DNS changes might take a few minutes to a few hours to fully propagate, depending on your provider.
Once the DNS updates are live, you’ll be able to use your custom subdomain (like qr.yourdomain.com) for QR code scanning with JoyQR, giving your users a seamless and branded experience.
How to create CNAME record on AWS
- Log in to your AWS account.
- Go to https://console.aws.amazon.com/route53/home?#
- Select "Registered domains" and click on the domain name you want to add a CNAME record for.
- Click on "Manage DNS" and then select the domain name again. You will see a list of DNS records for the domain.
- Click on "Create Record Set" to open a new interface.
- Fill in the required fields, including Name, Type, TTL, Value, and Routing Policy. Note: Make sure to select the "Alias" option as "No."
- Click on "Create" to save the new CNAME record.
How to create CNAME record on GoDaddy
- Log in to your GoDaddy account.
- Navigate to your list of domains and select the domain name you want to access.
- Once you're on the Domain Settings page, click on "Manage DNS" to open the zone file.
- Select "Add" and choose "CNAME" as the record type.
- Enter the details for the CNAME record, including the Name, Value, and TTL.
- Click on "Add Record" to save the CNAME record.
- You're done! The CNAME record will be updated within 48 hours.
How to create CNAME record on Google Domain
- To set up Cloud Identity, follow these steps:
- Go to the Cloud Identity Setup Wizard and copy the CNAME record provided.
- Look for the section that contains your domain's DNS records. This section may be labeled as Manage DNS, DNS Management, Name Server Management, or something similar.
- Locate the CNAME records for your domain.
- Paste the CNAME record you copied earlier into the records section.
- Save your changes.
How to create CNAME record on HostGator
- Log in to your Hostgator cPanel.
- Navigate to the "Domains" section and click on "Zone Editor".
- Click on the "+ CNAME Record" button.
- Enter the required details, such as the "Name" and "CNAME".
- Click on "Add a CNAME Record" to save the changes.
- That's it! Your CNAME record will be created.
How to create CNAME record on BlueHost
- Log in to your Bluehost hosting account.
- If you're using the Legacy interface, navigate to the Domains section and click on DNS Zone Editor. If you're using the Rock interface, go to Domains and click on Zone Editor.
- Select the domain name for which you want to create a CNAME record.
- Scroll down and click on Add DNS Record.
- In the Host Record field, enter the record name.
- Select CNAME from the Type drop-down menu.
- Enter the URL that the CNAME record should point to in the "Points To" field.
- Optionally, update any other fields as needed, or leave them set to their defaults.
- Click on Add Record to save the changes.
- That's it! The new CNAME record will be added to your domain..
How to create CNAME record on Cloudflare
- Log in to your Cloudflare dashboard.
- From the top-left dropdown menu, select the domain for which you want to create the CNAME record.
- Go to the DNS settings page.
- Beside the Search DNS bar, click on the "Add Record" button.
- Enter the necessary record details and select "CNAME" as the record type.
- Click on "Add Record" to save the new CNAME record.
- The newly created CNAME record will now appear in the DNS records list.
How to create CNAME record on NameCheap
- Log in to your Namecheap account.
- From the left side menu, select Domain List and find the domain name you want to add the CNAME record to. Click on the "Manage" button next to it.
- In the domain management page, navigate to the "Advanced DNS" section and click on "Add New Record"
- From the "Type" dropdown menu, select "CNAME Record" and fill in the "Host", "Value", and "TTL" fields as necessary.
- Once you have entered the required information, click on "Save All Changes".
- Your new CNAME record will now be created and ready to use.
Remember to allow some time for the changes to propagate across the DNS system, which can take up to 24 hours. This will ensure that your new CNAME record is properly set up and functioning correctly.